Wood cabinets add beauty and value to a home, but they can sustain damage over time. Identifying and addressing these issues before refinishing can preserve their beauty and function. For superficial scratches, a furniture touch-up marker that matches the cabinet’s color can conceal them. Deeper dents and gouges may require more extensive repair methods.
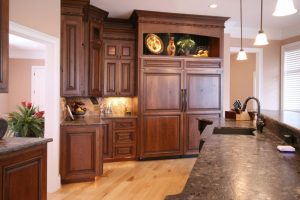
Cabinet Refinishing Modesto is a significant investment in your home, and a smooth surface elevates both the look and durability of your new finish. Taking the time to repair scratches, dents, and gouges before beginning your project prevents these imperfections from showing through and compromising your final results. While attempting to touch-up paint cabinets yourself is possible, it’s often best left to the professionals to ensure consistent results. Here are some of our favorite techniques for repairing small blemishes on wood cabinets prior to refinishing or painting.
Light scratches and nicks are easy to repair with a little patience and the right tools. The first step is assessing the severity of the scratch to determine how deep it is and if it goes beyond the outer layer of wood. If it does, you’ll need a more extensive repair method.
If the scratch is shallow and doesn’t affect the finished surface, you can use a wax crayon or marker that closely matches your cabinet color to fill in the damaged area. Gently rub the mark into place, blending it with the surrounding wood and avoiding over-applying product.
Another way to conceal light scratches on wood cabinetry is by applying a clear varnish. Varnishing preserves the natural beauty of wood and protects it from moisture damage. Apply a thin coat with a brush, and allow it to dry completely before using the cabinets. Adding a second coat will build up the material for additional protection and added shine.
For deeper dings and dents, a wooden putty or filler that matches the cabinet’s color can be used to fill the damaged area. Once the putty dries, it can be sanded and buffed to be flush with the existing cabinet surface. The refinished area can then be stained and sealed as needed for your desired look.
Other common kitchen cabinet repairs include replacing worn hardware and liners for drawers and shelves. New handles, knobs, and hinges can instantly refresh the appearance of your cabinetry and replace outdated or worn pieces. Liners keep items from sliding around and scuffing the cabinet interiors, and they can be cut to size for accurate installation. Finally, installing soft-close hinges helps ease the cabinet doors into place and prevent squeaky or loose hinges.
Repairing Dents and Gouges
Small blemishes on cabinets can detract from the overall look of your kitchen. While a fresh coat of paint can cover up these imperfections, there are some stains and scratches that require a little more work. Using the right techniques and materials for cabinet repair will help you achieve a smooth finish. It’s important to thoroughly clean the cabinets before starting any repairs. This will eliminate any dirt or grease that could interfere with the adhesion of the repair material and new paint. Once the cleaning process is complete, it’s time to prime the cabinets. A high-quality primer will ensure that the new paint clings to the surface and helps to hide any existing marks.
The type of damage will determine the best approach to repairing it. For instance, light scratches only affect the surface and may only need a touch-up, while deeper gouges might need to be filled in with wood filler. Sanding plays a key role in both cases, as it allows the repaired area to blend seamlessly with the rest of the cabinet’s surface. It’s important to use sandpaper with a range of grits, beginning with a coarser option and moving to a finer grit once the blemish is smoothed out.
For deeper dents and gouges, wood putty or filler that matches the cabinet’s color is used to fill the damaged area. Once the putty is dry, it’s sanded to be flush with the cabinet’s surface before being refinished as normal. Once the refinishing is complete, the repair will be nearly invisible and the cabinets will look like new.
If your cabinets are looking a bit dull, a coat of clear varnish can revive their shine and protect the wood. Apply the varnish with a brush in even strokes, and then buff it gently to enhance the finish and add a protective layer. If your cabinets have squeaky or loose hinges, installing soft-close hinges can help restore them to proper functioning and give the doors a stylish upgrade.
If your cabinets are showing signs of age and need significant repairs, it’s important to weigh the costs of repairing them against the cost of replacing them. Although repairing is often more cost-effective than replacement, the expense of new cabinets may offer better value in the long run.
Refinishing or Painting
Cabinets can be painted or refinished to change the look and feel of your kitchen. When refinishing cabinets, it’s important to address any existing damage like scratches or dents. Knowing how to fix these problems ensures your new finish will be flawless and last longer.
First, you will need to prepare the cabinet surfaces to paint or refinish. This involves cleaning the surface and sanding it lightly to smooth out any rough spots. This will help the paint adhere and prevent peeling down the road. It is also recommended that you use a degreaser for this step to remove grease and steam build up from the high-traffic areas of your kitchen.
Once you’ve cleaned and sanded the cabinets, it’s time to apply primer. This is a vital step for painting cabinets because it creates a base layer that the paint will stick to. After applying the primer, you’ll need to sand again with fine grit paper. This will help create a smooth surface that will be easier to finish.
Then you can apply the desired color of paint with a foam cabinet roller and brush where needed. After the paint dries, you can replace the hardware. To keep your kitchen looking sleek and clean, I recommend using KILZ 3(r) PREMIUM Primer because it has great adhesion that helps prevent chipping or peeling in the future and is mildew resistant for moisture prone areas of your home like the kitchen.
Wood cabinets are a beautiful and timeless addition to any kitchen. Recognizing when a scratch is too deep to repair with a DIY method is important so that you can schedule professional repairs or replacements as necessary. If the damage is too severe, it could affect your cabinets’ structural integrity and lead to further issues like swelling or water damage. A professional can restore the damage and ensure that the area is seamlessly blended with the surrounding cabinets. This will save you time, money, and effort in the long run. Plus, a professional will have the tools and experience to do the job right the first time.
Replacement
Wood cabinets add beauty and value to your home, but over time they can show signs of wear and tear. Understanding how to fix minor cabinet damage can preserve their functionality and appearance. Recognizing when it’s time for a replacement can save you money and frustration.
Surface scratches and nicks can be repaired by lightly sanding the affected area and applying a touch-up marker that matches the cabinet’s color. Deeper dents and gouges require more extensive repair. A professional can use a filler that is compatible with the type of wood used in the cabinet, then sand the repaired area to be flush with the surrounding surfaces.
When it comes to refinishing or painting, using a primer specifically designed for cabinetry can create a base layer that is resistant to chipping and scratching. This will help the paint or stain last longer. If the cabinet door hinges or handles are rusty or damaged, these can be refinished or replaced as well.
Adding a new cabinet door can be an effective way to completely change the look of a kitchen without undergoing a major renovation project. A professional can help you select a new style and material that suits your taste, budget, and cooking needs. You can also personalize your new kitchen cabinets with custom hardware.
To replace cabinet doors, first clean the old ones thoroughly with a gentle degreaser or a mixture of baking soda and water to remove built-up grime. Once the surface is clean, you can install your new doors. It’s important to match the thickness of the cabinet boxes to the thickness of the new doors so they hang properly.
To update a cabinet door with a more contemporary look, consider replacing the center panel with a piece of glass. You can select from clear, frosted, or seeded glass to give your cabinets an eye-catching new look. To make the process easier, you can have a local glass shop cut the panel to size and provide you with clips to attach the new glass. You can then mount the glass to the cabinet using a jigsaw or router.
